Pages

Showing posts with label Crochet projects. Show all posts

Saturday, September 6, 2014

Announcing Penelope, another SugarSpun Skullz by CopperSlay with jointed body!

Yes, it's been a long year and I am now working on a new SugarSpun Skullz crochet pattern by CopperSlay! This pattern utilizes both standard and amigurumi crochet techniques/stitches and is a jointed doll with a different 'skull' design that Shouggie (http://stitchedmusings.blogspot.com/2013/08/wheres-shouggie.html) or LOLing Percie had (http://stitchedmusings.blogspot.com/2013/09/sugarspun-skull-ii-loling-percy.html).

I will be adding a free tutorial for jointed dolls next week that is EASY PEASY. I hope you check back in to see the progress on Penelope. :)


Thursday, August 22, 2013

Sugar Skull Doll, Free Pattern: Baby Doll Tri-flowered headband


For this doll headband I used sport weight yarn scraps and an 'E' hook.

1) First I measured the circumference of the doll or baby's head. In my case, I wanted a headband for my 'Shouggie' SugarSpun Skull ornament.


2) I then performed the chainless half double crochet foundation to the length I needed. I love this stitch because it gives headbands additional 'stretch' and because you don't have to guess about how many chains to do. Here is a brilliant tutorial for the Chainless Half Double Crochet Foundation.


3) I cut my yarn leaving a pretty long piece, threaded a big needle, and whipstitched the ends right sides together.


4) Using the color of your choice I chain stitched between each stitch on the top and bottom edges, BO and weave in ends.


5) I  always start my flowers with a Magic Circle. I LOVE IT. Here's the tutorial for it (I love the Crochet Geek too, can't you tell? :)): 


Starting with the magic circle ch1 and sc in the ring. ch3, [sc in the ring, ch3] 5 times, and then slip stitch in first sc. BO. Make 3 (or more if you want) and position them on your headband.


6) Thread your needle with a contrasting thread and stitch the flowers to the headband in places that looks like little veins in the leaves. BO, weave in loose4 ends and put in on your Doll. TaDa! Enjoy!


Now the Shouggie SugarSpun Skullz ornament is ready to hang out! :) The 'Shouggie' Skull Crochet pattern is now on sale in my Etsy Shop! Click on link below. :)


Wednesday, August 21, 2013

Where's Shouggie?

My latest crochet design has been more fun than anything I can remember. Hard work getting the exact form I was looking for, but loads of fun embellishing to achieve the personality that reflects how I have felt lately. Happily Mischievous. Introducing: Shouggie, the first of CopperSlay's Amigurumi SugarSpun Skullz. :) On sale in My Etsy Shop very soon!

Where is she? Is she hiding from me? :/


Tuesday, August 20, 2013

New Pattern Release and Giveaway

Click on over to my friend Jennifer's blog and leave a comment to enter a pattern giveaway! Isn't this beanie design adorable?


Saturday, August 10, 2013

PuffyStuff Package Deal


Specially priced: https://www.etsy.com/listing/159273461/crochet-star-pattern-amigurumi-heart?ref=shop_home_active

Bruge lace -WIP

I enjoyed working on this Bruge Lace piece. It was a charted pattern I found somewhere on the web.


Star Flower Pillow Crochet Pattern


I have been playing around with quilt block patterns to crochet, This one came out especially pretty I think. :)


https://www.etsy.com/listing/158585676/crochet-star-flower-pattern-pillow-star?ref=shop_home_active

Wednesday, August 7, 2013

Star Flower Cloche


Star Flower Cloche

Supplies for hat to fit 10"-12" head.(Larger sz see Red Type)
1) "F" Crochet Hook
2) baby weight yarn (I used Bernat Baby Coordinates, "3", lightweight)
3) long needle
4) sewing thread
4) something to measure with


Special Stitch:
Shell = 2dc ch2 2dc

1) Magic Circle,  ch3,  9dc in ring, join. (10dc)
OR
ch3,  9dc in third chain from hook,  join.  (10 dc)
2) ch3, dc in same stitch, *2dc in nxt stitch* *repeat  *to** around to end. join. (20dc)
3) ch3, 2dc in nxt stitch, *dc in nxt stitch, 2dc in nxt stitch**  repeat *to** around to end. join. (30dc)
[color=#ee4a2d]measure around the largest part of the circle you now have, if its 1" less or the same as baby's head, proceed to Row 4.
If not big enough repeat Row 3. (45dc)[/color]
4)  ch3, dc,ch2, 2dc all in beginning stitch, *skip 2 stitches, shell in nxt stitch*** around to end and join. (the number of shells you have depends on whether you used the additional row printed in red) (10 shells or [color=#ee4a2d]15 shells)[/color]
5) sl st into ch1 space, (ch3 dc ch2 2dc) in same ch1 space. Shell in each ch1 space around, join.
6-8) Repeat Row 5.
9) sl st into ch1 space. ch3 &4dc all in same space, Shell in each ch1 space around, join. Break off.

Flower:
1) ch4 and join.
2) ch2, 7hdc in ring, join.
3) ch3 & 4 dc in same starting stitch, then 5dc in each stitch around, join. (40dc)
this gives the flower petals a wavy effect. Break off.

Star:
1) ch2 and then *hdc, dc, hdc, sc**  in second chain from hook, and *to** 4 more times (all in the ring) join.

Sew star onto flower and attach to cloche.
Enjoy!


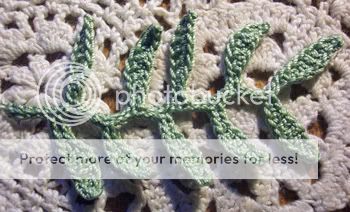
Crochet Applique or Embellishment, 'Sprig of leaves'

                  Crochet "sprigs of leaves" embroidered to a crazy quilt bodice.

In sage green #10 (bedspread wt.) and sz 7 hook:

{chain 14.
sc in 2nd ch from hook, hdc in next chain, 3 dc in next three chains, hdc in next, 2 sc in next (leaf formed)}

Repeat {} for desired length of sprig, after top leaf is formed reverse direction and work back down the chain.
sc in first four open chains,

{(ch 10, sc in 2nd ch from hook, hdc in next chain, 3 dc in next three chains, hdc in next, 2 sc in next (leaf formed)
sc in next 4 open chains.)}

Repeat {} until end of chain is reached.


Friday, January 27, 2012

Crochet in 2012

Loving Crochet this month! Look for new patterns soon on Etsy and my little forum, Sisters N Stitches.