Pages

Thursday, August 22, 2013

Sugar Skull Doll, Free Pattern: Baby Doll Tri-flowered headband


For this doll headband I used sport weight yarn scraps and an 'E' hook.

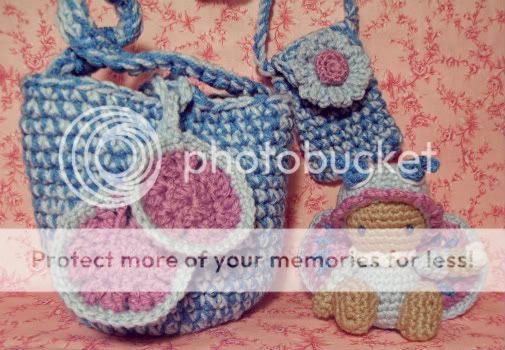
1) First I measured the circumference of the doll or baby's head. In my case, I wanted a headband for my 'Shouggie' SugarSpun Skull ornament.


2) I then performed the chainless half double crochet foundation to the length I needed. I love this stitch because it gives headbands additional 'stretch' and because you don't have to guess about how many chains to do. Here is a brilliant tutorial for the Chainless Half Double Crochet Foundation.


3) I cut my yarn leaving a pretty long piece, threaded a big needle, and whipstitched the ends right sides together.


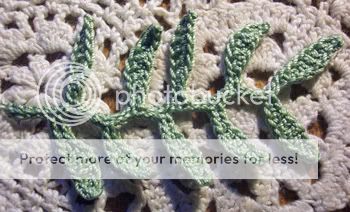
4) Using the color of your choice I chain stitched between each stitch on the top and bottom edges, BO and weave in ends.


5) I  always start my flowers with a Magic Circle. I LOVE IT. Here's the tutorial for it (I love the Crochet Geek too, can't you tell? :)): 


Starting with the magic circle ch1 and sc in the ring. ch3, [sc in the ring, ch3] 5 times, and then slip stitch in first sc. BO. Make 3 (or more if you want) and position them on your headband.


6) Thread your needle with a contrasting thread and stitch the flowers to the headband in places that looks like little veins in the leaves. BO, weave in loose4 ends and put in on your Doll. TaDa! Enjoy!


Now the Shouggie SugarSpun Skullz ornament is ready to hang out! :) The 'Shouggie' Skull Crochet pattern is now on sale in my Etsy Shop! Click on link below. :)


Wednesday, August 21, 2013

Where's Shouggie?

My latest crochet design has been more fun than anything I can remember. Hard work getting the exact form I was looking for, but loads of fun embellishing to achieve the personality that reflects how I have felt lately. Happily Mischievous. Introducing: Shouggie, the first of CopperSlay's Amigurumi SugarSpun Skullz. :) On sale in My Etsy Shop very soon!

Where is she? Is she hiding from me? :/


Tuesday, August 20, 2013

New Pattern Release and Giveaway

Click on over to my friend Jennifer's blog and leave a comment to enter a pattern giveaway! Isn't this beanie design adorable?


Thursday, August 15, 2013

Photoshopping my painting

I scanned a painting of mine and then played around with Photoshop. I was pleased with the results and had lots of fun too. :)


'Woman in Three' clay sculpture and wood carving.

Woodcarving and clay molded. I named it 'Woman in three.'


Fabric Painting: 'Curious Bears' and 'Pansie.'

I enjoy painting on denim, little jumpers in a sz 4 are perfect canvas to me. :)


Fabric Doll (the face is two fabric circles sewn together, and a rather 'flat' surface that I paint the face on).


Fabric Collage Quilt

Fabric Collage Quilt I designed recently which I named 'Sister.'


Saturday, August 10, 2013

PuffyStuff Package Deal


Specially priced: https://www.etsy.com/listing/159273461/crochet-star-pattern-amigurumi-heart?ref=shop_home_active

Bruge lace -WIP

I enjoyed working on this Bruge Lace piece. It was a charted pattern I found somewhere on the web.


Star Flower Pillow Crochet Pattern


I have been playing around with quilt block patterns to crochet, This one came out especially pretty I think. :)


https://www.etsy.com/listing/158585676/crochet-star-flower-pattern-pillow-star?ref=shop_home_active

Friday, August 9, 2013

WIP: Irish Crochet Vest

A vest I am currently working on (the Liz Claiborne underneath is the template). Note: this is just a hobby for me and I am nowhere near professional like I see all over the net, but wanted others to feel confident enough to give it a try. Click for a closer view, you won't be disappointed. I already realize my motifs do not repeat enough, in other words I am using too many different ones. :(

I get started creating and just can't stop!

It's very rewarding. :)


Wednesday, August 7, 2013

Star Flower Cloche


Star Flower Cloche

Supplies for hat to fit 10"-12" head.(Larger sz see Red Type)
1) "F" Crochet Hook
2) baby weight yarn (I used Bernat Baby Coordinates, "3", lightweight)
3) long needle
4) sewing thread
4) something to measure with


Special Stitch:
Shell = 2dc ch2 2dc

1) Magic Circle,  ch3,  9dc in ring, join. (10dc)
OR
ch3,  9dc in third chain from hook,  join.  (10 dc)
2) ch3, dc in same stitch, *2dc in nxt stitch* *repeat  *to** around to end. join. (20dc)
3) ch3, 2dc in nxt stitch, *dc in nxt stitch, 2dc in nxt stitch**  repeat *to** around to end. join. (30dc)
[color=#ee4a2d]measure around the largest part of the circle you now have, if its 1" less or the same as baby's head, proceed to Row 4.
If not big enough repeat Row 3. (45dc)[/color]
4)  ch3, dc,ch2, 2dc all in beginning stitch, *skip 2 stitches, shell in nxt stitch*** around to end and join. (the number of shells you have depends on whether you used the additional row printed in red) (10 shells or [color=#ee4a2d]15 shells)[/color]
5) sl st into ch1 space, (ch3 dc ch2 2dc) in same ch1 space. Shell in each ch1 space around, join.
6-8) Repeat Row 5.
9) sl st into ch1 space. ch3 &4dc all in same space, Shell in each ch1 space around, join. Break off.

Flower:
1) ch4 and join.
2) ch2, 7hdc in ring, join.
3) ch3 & 4 dc in same starting stitch, then 5dc in each stitch around, join. (40dc)
this gives the flower petals a wavy effect. Break off.

Star:
1) ch2 and then *hdc, dc, hdc, sc**  in second chain from hook, and *to** 4 more times (all in the ring) join.

Sew star onto flower and attach to cloche.
Enjoy!


Doll or Baby Sack Hat


Doll or Baby Sack Hat.

Using Bernat Baby Coordinates and an F hook, your finished hat should fit a 10" head following the directions below. In order to enlarge your hat, lengthen your beginning chain to a bit over half the circumference you desire or use a larger size hook and/or yarn.

Yarn: Bernat Baby Coordinates (pink, a bit of aqua, and a tad of white) :D
hook: Sz "F"

With pink (or main color) ch 19, sc in second ch from hook.
Row 1) sc in each chain across until you reach the last ch, stitch a total of 3 sc in last chain.
sc in each ch up the opposite side of starting chain, 2 sc in first ch and sl st into first sc.
Total of 38 sc.

Row 2) ch1, sc in each sc across, sc in each of 3 sc in end.
sc in each sc across, sc in two sc in end, sl st into first sc of round.

Row 3-14) repeat Row 2. Break off.

White:
Row 15) sl st with white into any sc. ch1, sc into same stitch and in each sc around.
sl st into first white sc to join.

Row 16) ch1 and sc in next stitch. (ch 3, sk one sc and sc in next stitch (sc).)
Repeat ( ) to next to last sc, ch3 and sl st into first sc to join. Break off.

Aqua: Slip Stitch between any two white sc.
Continue slip stitching between each white single crochet around to beginning and break off. This is a cute & easy decorative touch to your border. ;) I used this stitch with the wrong side facing me so that the decorative stitch would be on the right side when the hat brim was turned up. Its up to you though.


Squiggles:
With Aqua: Ch 20, hdc in third ch from hook. Another hdc in same stitch.
3 hdc in each ch across, break off.

Make another aqua Squiggle and two white ones, you can make them longer by using a longer starting chain if you prefer.

Now cut one 12" length of pink, white and aqua. Know the end and braid until approx half an inch from the end. Knot to secure.

Repeat for a second braid for the other hat point, and tie each in a bow.

Taking a white Squiggle, an Aqua Squiggle and a bow, sew to one of the hat points, repeat on the opposite side.

Presto! Its a Sack Hat!


Cellphone Case Free pattern


Cellphone bag, continuous spiral, use stitchmarker or count as you progress. (fits my LG)

Round 1> With two strands of yarn and ‘J’ hook, chain 9.

***at this point stop and check to see if this covers the width of your phone, if not increase or decrease as needed***

sc in 2nd chain from hook, and along length of chain. Put 2sc in the last chain, and then sc up the opposite side of the chain ending with another sc in the same chain as the first sc performed. (Total= 16sc or total for your size)

Round 2-12> sc in each sc around.

*** at this point check to see if this covers the length of your phone, if not add some more rows of ‘sc in each sc.’***

Round 13-15> sc one side of the bag (7sc if you are using my measurements), chain 1, turn (these three rounds form the flap of the bag, see image below).
Round 16> Chain 7, sl stitch into the last sc of the flap forming a loop, secure and break off.

Strap for cell bag, Two strands of yarn and J hook.

In this step you will form the strap, secure it to the bag, and finish off the sides of your flap for a neater appearance.
Step One> Chain 75 (or the length you desire).
Step 2> sc into the side of the first sc from Round 13, sc into side of sc of round 14, then in the side of sc of round 15. Continue sc over the chain 7 loop around to the other side of the flap. sc into the side of the sc of round 15, 14, then finally sc into the side of sc from round 13, including the free end of your chain 75.

Step 3> Secure and break off.


Flower for Cell Bag, joined rounds, one strand of yarn and G Hook.

Round 1>  Begin with 8 sc in a Magic Circle. slip stitch to join. Close tightly.
Round 2> chain 6 (counts as beginning dc and chain 3), dc into same stitch, chain 3, (dc, chain 3, dc, chain 3 in same stitch) 7 times. Join with slip stitch and break off.

Flower Center, continuous spiral, move stitchmarker as you progress.
Round 1> Begin with 6sc in a Magic Circle.
Round 2> 2sc in each stitch around. (Total= 12sc)
Round 3> sc in each stitch around. (Total= 12sc)
Round 4> sc DEC in each stitch. (Total= 6sc) this forms the 3-D ‘button look’ instead of just a plain flat center. Sew the button to the flower center.
Position on cell bag and secure so that the flap loop fits over flower to close bag.

Enjoy!


The cellphone case is a featured free pattern from my Flutterbye Collection, which is now available for purchase in My Etsy shop found HERE.


Crochet Heart (applique or embellishment)


You just can't go wrong with hearts.

Its one of those symbols everyone understands.

Here's a quick pattern you can use to create ornaments, coasters or afghans, embellish jeans,handbags and more.

I Used sz. 10 crochet thread and #7 hook in this example, but you can experiment with other yarns and hooks for more versatility.

This one starts with a traditional Granny Square.

1) With burgundy thread ch4, join to form ring.

2) ch3, 2dc, ch2, 3dc, ch2, 3dc, ch2, 3dc, ch2, join. Break off or carry.

3) With sage green attach in ch2 space, ch3-2dc- ch2- 3dc (all in ch2 space) ch1, 3dc-ch2-3dc in nxt ch2 space. ch1 3dc-ch2-3dc in nxt ch2 space. ch1 3dc-ch2-3dc in nxt ch2 space. ch1 and join. Break off .

4) Attach or pick up Burgundy thread (sl st into ch2 space if necessary). ch3-2dc-ch2-3dc (all in same ch2 space). ch1 3dc (in nxt ch1 space) ch1. 3dc-ch2-3dc ( in nxt ch2 space). ch1, 3dc (in nxt ch1 space), ch1 3dc-ch2-3dc (all in same ch2 space) ch1, 3dc (in same ch1 space) ch1 3dc-ch2-3dc (all in same ch2 space) ch1, 3dc, ch1 and join.

5) sl st to corner ch2 space. Find the center stitch in the side of the square (for me it was the middle dc in the center of the middle 3dc group) 7 treble crochet stitch into center stitch (forms half of the heart's curve) sl st into nxt corner ch2 space and 7treble crochet into next center of the side. Second curve is made. break off.

Crochet Applique or Embellishment, 'Sprig of leaves'

                  Crochet "sprigs of leaves" embroidered to a crazy quilt bodice.

In sage green #10 (bedspread wt.) and sz 7 hook:

{chain 14.
sc in 2nd ch from hook, hdc in next chain, 3 dc in next three chains, hdc in next, 2 sc in next (leaf formed)}

Repeat {} for desired length of sprig, after top leaf is formed reverse direction and work back down the chain.
sc in first four open chains,

{(ch 10, sc in 2nd ch from hook, hdc in next chain, 3 dc in next three chains, hdc in next, 2 sc in next (leaf formed)
sc in next 4 open chains.)}

Repeat {} until end of chain is reached.


Saturday, August 3, 2013

Latest Crochet design on Etsy!

My latest crochet pattern is now available on Etsy. It was a very exciting experience piecing these motifs!

Friend me on FB: Copper Slay
Follow me here: Copper Slay